

Quick reference
The full journey (diagram)
Example: Nova Retail’s first hour
Sam signs up with email for Nova Retail.
Sam never saw
/oauth-onboarding because email signup creates the workspace automatically.
Contrast: Alex uses Continue with Google as a brand-new user → /oauth-onboarding → enters org Alex Studio, workspace Main → Chat.
Part 1 — Creating your account
Sign up (/signup)
Path: Open the app sign-up page or marketing Start trial links.
Header copy: “Create your account” · “Start your 7-day free trial. No credit card required.”
Options:
Password requirements (email):
- Upper & lowercase letters
- At least one number
- Special character (
!@#$%^&*) - Minimum 8 characters
You do not need a separate “create workspace” step after email signup.
Sign in (/signin)
Path: /signin
Google errors (cancelled, missing code, failed) show on sign-in and clear the URL.
Google OAuth workspace setup (/oauth-onboarding)
When: First-time Google sign-in with no workspace membership.
Page title: “Set up your workspace”Subtitle: “Create your organization and workspace to get started.”
Click Continue → organization + workspace + owner membership created → redirect to
/chat.
If you already have a workspace: This page redirects you to /chat — you cannot create a second org through this flow.
Auth guard: While needsOnboarding is true, any dashboard URL redirects here before Chat, Settings, etc.
Part 2 — Invited teammates (different path)
Path: Invitation email link with token → invite accept page.
Invited users skip:
/signupcompany creation/oauth-onboarding
Part 3 — In-app Onboarding checklist (/onboarding)
After your account and workspace exist, use the Onboarding page as a guided checklist.
How to open it
Page title: “Let’s get you set up”
Subtitle (live): remaining-step copy, for example “connect channels, labels, AI agent, and team.” Access note: The nav item requires overview page permission (owners/admins). The URL
/onboarding remains reachable for authenticated users who know the path — useful if your role is expanding.
Layout
- Left: Four expandable accordion steps (one open at a time; Step 1 open by default)
- Right: Resources panel — Intro, Contact, Book, Help center, Video guides (quick links for support content)
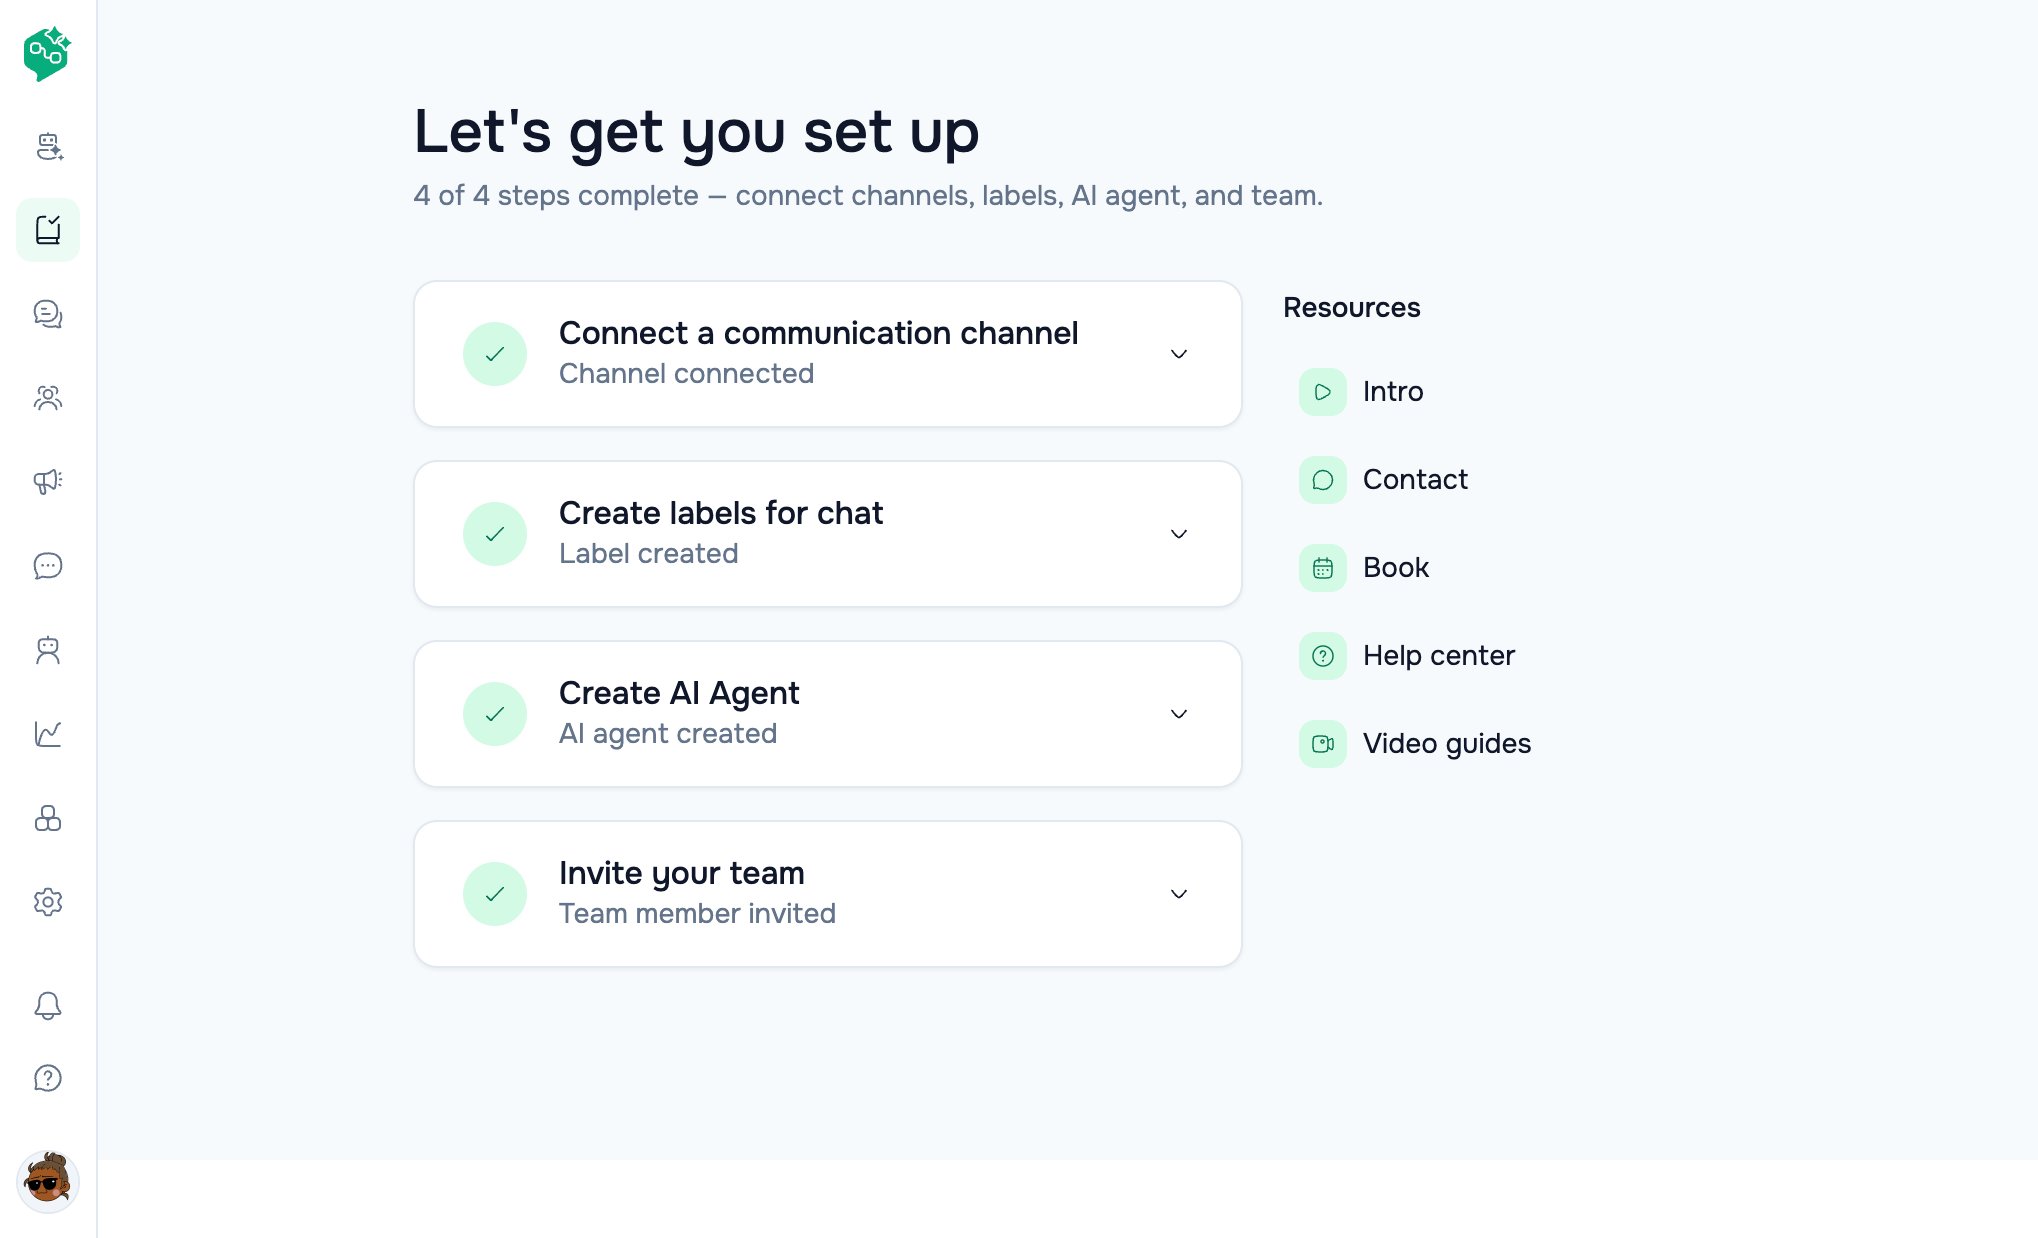
Onboarding checklist
Step 1 — Connect a communication channel
Accordion title: Connect a communication channelSubtitle: Select where you want to send messages from Body:
- Explains managing WhatsApp, Messenger, Instagram from workspace settings
- Manage channels button →
/settings/workspace/channels - Embedded channel setup video (YouTube) in the accordion
- Click Manage channels
- Add Channel → Channel Catalog
- Connect WhatsApp, Messenger, or Instagram (see channels docs)
- Wait until channel status is active
- Return to Onboarding or open Chat
Step 2 — Create labels for chat
Accordion title: Create labels for chatSubtitle: Organize your inbox with custom tags and categories Body: Labels help filter chats, assign work, and track topics. Button: Create Your First Label →
/settings/workspace/labels
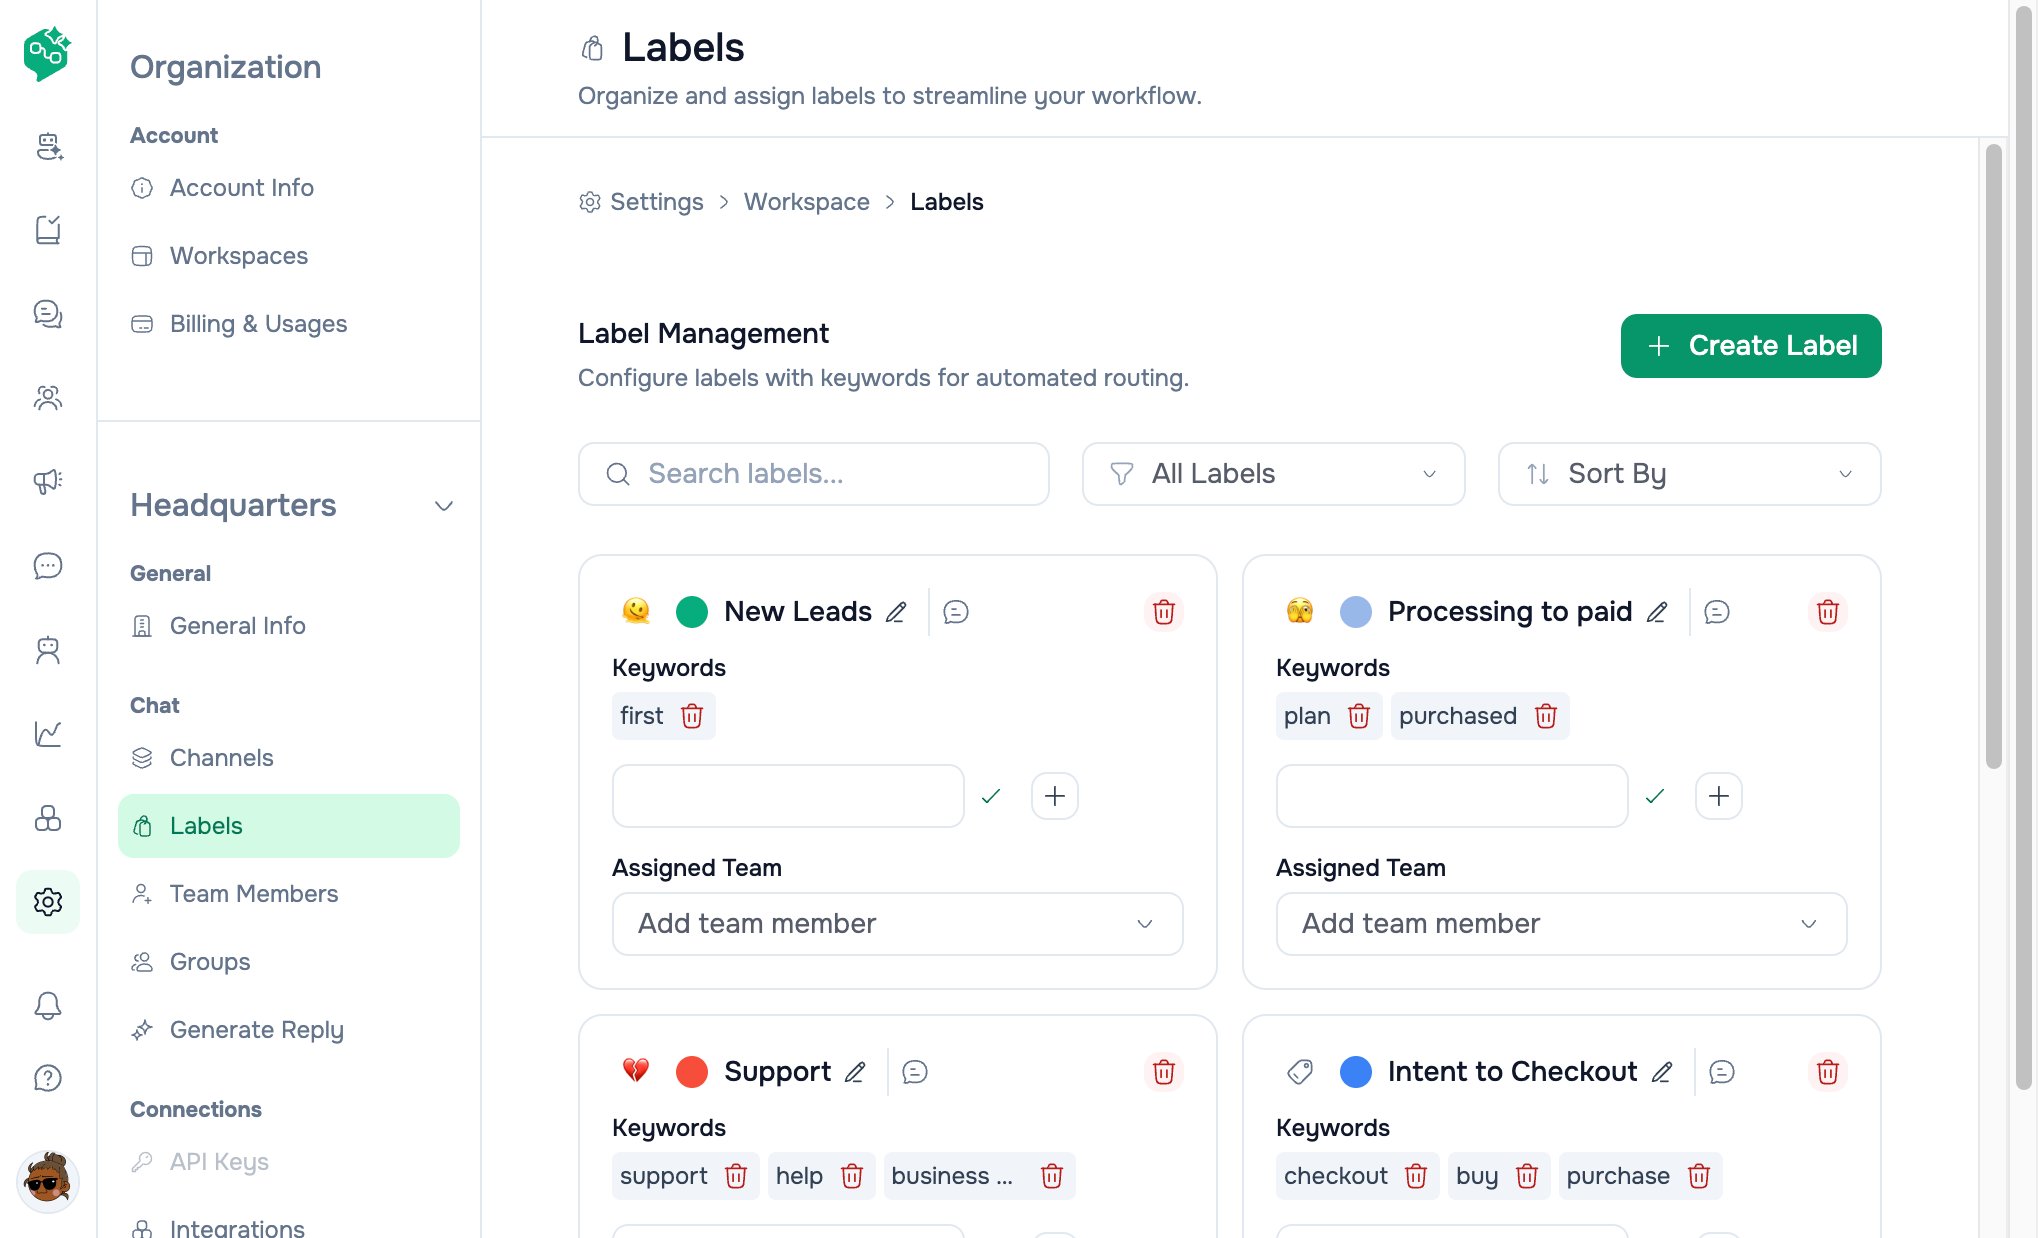
Labels
Create at least two before campaign volume — onboarding best practice.
Deep dive: Shared inbox & labels
Step 3 — Create AI Agent
Accordion title: Create AI AgentSubtitle (when done): AI agent created Live checklist (Sep 2026): Step 3 is Create AI Agent, not n8n. Integrations stay under Settings → Workspace → Integrations. What to do:
- Open AI Agents (
/ai-agents) - Browse templates or Create AI Agent
- Save, then test in the sandbox before assigning live threads
Tip: Step 3 is optional on day one. Connect a channel and reply manually first; add a bot when after-hours volume appears.
Deep dive: Creating & training AI Agents · Integrations overview
Step 4 — Invite your team
Accordion title: Invite your teamSubtitle: Collaborate on chats and manage support together Button: Add Team Member →
/settings/workspace/team-members
What to do:
- Open Team Members
- Invite with email and role
- Teammate accepts via email link
- They appear in Chat for shared inbox work
Deep dive: Channels FAQ — permissions
Part 4 — After onboarding — daily work
Open Chat
Path: Sidebar Chat →/chat
This is your shared inbox. Every message from connected channels appears here.
First reply checklist
- At least one channel Active
- Customer sent an inbound message (or you started outbound where allowed)
- Reply sent from Chat composer
- Teammate can see the same thread
Settings you’ll use next
Ask Co-Admin
Open AI Workspace Co-Admin and ask in plain language:- “How do I connect WhatsApp?”
- “What are labels for?”
- “How do I invite my team?”
Navigation map (getting started)
What good looks like — timelines
First 30 minutes (owner)
- Complete account (signup or oauth-onboarding)
- Onboarding Step 1 — one active channel
- Onboarding Step 2 — two labels
- First reply in Chat
First day
- Second teammate invited and has replied
- Labels used on real threads
- Skim Integrations / AI Agents — don’t need to enable yet
First week (Luna Home Decor pattern)
See Welcome — Luna example.